Linux is the preferred environment for running Cascade and interfacing with the DE10-Nano. Cascade cannot currently be compiled on Windows and macOS lacks the drivers necessary for interfacing with the DE-10 boards. Therefore, you will need to install Linux in order to access all the features of Cascade needed for this lab. For most students, this will involve running Linux from within a VirtualBox VM. While it is also possible to install Linux natively or with commercial VM software, you do so at your own risk. If you already have admin privileges on a native Linux installation, you can skip the appropriate sections.
To install VirtualBox on Windows, simply run VirtualBox-*-Win.exe. On macOS, open VirtualBox-*-OSX.dmg and run VirtualBox.pkg from the newly-mounted disk image. The installer is pretty straightforward, just follow the directions and opt to install USB drivers if prompted. After VirtualBox is installed, open it and install the Extension Pack. VirtualBox may prompt to do this automatically or you may have to do so manually via the Extensions pane in the Settings / Preferences dialog.
To verify everything worked, launch the VM. The default username is "cascade" and the default password is "password". You should see a few folders on the desktop: cascade, containting a ready-to-run copy of the Cascade repo; intelFPGA_lite, containing an installation of Intel's Quartus FPGA software; and cascade.zip, containing a ZIPed copy of a clean version of the Cascade repo. You may want to install updates, pull the latest copy of Cascade, and do a clean build to make sure you have the latest bug fixes.
git pull; make clean; make
Once your Linux installation is working, you'll need to install Cascade on it. If you want to use Cascade's JIT functionality, you'll also need to install Intel's FPGA compiler, Quartus, as well.
sudo apt-get install gcc g++ git)chmod +x *.run and then running it with sudo. The installer
should automatically detect and install the Cyclone V device files.tar -xvf . Quartus-lite-18.1.0.625-linux.tar
and run it with sudo ./setup.sh. Only install device drivers
for the Cyclone V FPGAs as those are the only ones you need.make check may take some time.--recursive flag! I didn't on my first attempt.)ssh into the DE10 and build
cascade from the command line.Once you've got your Linux installation working, you will be able to use all the Verilog capabilities necessary to write your code for the lab. However, since the hardware you describe with your code is being simulated in software, you may find it runs slower than desired. For this purpose, Cascade can take advantage of the FPGA on the DE10-Nano to run your hardware as intended. This required getting Linux working on the DE10 (to run Cascade), configuring your VM to be able to connect to the DE10, and configuring Linux on your VM to do the JIT compliation to convert your Verilog to an actual hardware configuration.
Due to the complexity of getting Cascade running on a DE10-Nano, we have compiled a microSD card image that contains everything you need to get Cascade running on the DE10. Before proceeding make sure you have:
Card Reader or similar.
Next, determine which device Linux has assigned to your SD card reader. It is
extremely important that you get this right as overwriting the wrong device can
cause you to lose all the files in your VM and make it unusable. Open the Disks
utility and select the entry on the right corresponding to your microSD reader.
On the right window, look for Device /dev/sdX# and note the
letter corresponding to the microSD reader. We will assume it will be
Device /dev/sdb in these instructions, but be sure to change
the device name if it's different for you.
Once you've identified the microSD device name,
open a terminal and navigate to the directory you downloaded the image to.
We will use the dd utility to update the image.
The next steps will overwrite the microSD card, so make sure you don't have
any files you want to keep on it!
First, make sure all partitions on the SD card are unmounted. Run:
sudo umount /dev/sdb*
Then, we'll use the dd utility to copy the image over,
4 megabytes at a time, decompressing the image as we go:
tar xzOf cs378h.tar.gz | sudo dd of=/dev/sdb bs=4M
When dd is done, it will output something similar to:
463+1 records in
463+1 records out
1945317376 bytes (1.9 GB, 1.8 GiB) copied, 55.269 s, 35.2 MB/s
The microSD card is now initialized with Linux and ready to go. Insert it into the slot on the underside of the DE10 with the pins facing toward the board.
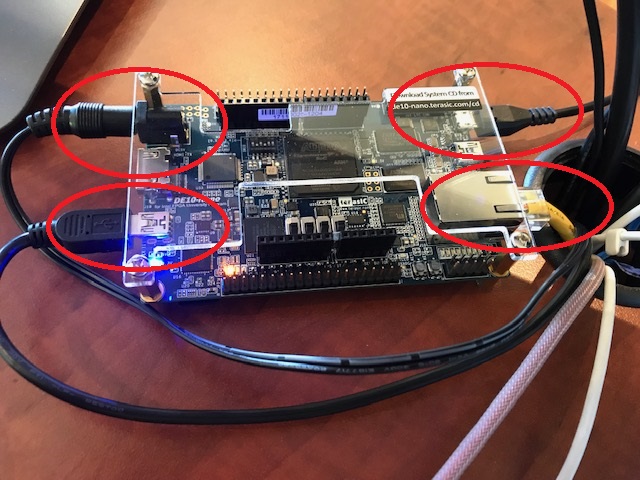
In order to access the DE-10 from your VM, you'll want to configure device
filters under the the VM's settings→Ports→USB pane. You can add a
filter by clicking the plus button and selecting a currently-detected USB device
to capture. The Micro-USB cable should show up as Linux 4... or as
Netchip RNDIS/Ethernet. It is important to add a filter for this
device now because your OS may prevent you from passing it through if it's not
captured as soon as it's attached. After you've started your VM, reconnect this
cable and check the Devices→USB menu to look for a check mark to make sure
it was captured properly. If it wasn't, you may need to reconnect the cable
until it is.
The Mini-USB cable should show up as Altera DE-SoC,
but may only show up as Altera until after the VM starts or after
reconnecting the cable a couple times. If you're seeing the Altera
device, don't bother adding a filter for it because VirtualBox treats it
differently from the Altera DE-SoC.
Note that this cable can be attached to the VM after it's plugged in, so
adding a device filter is merely a matter of convenience in this case.
In the virtual machine, you should be able to now SSH into the Ubuntu 18.04
installation running on the ARM cores of the DE10. The username and password
are both set to fpga, and the IP address will be
192.168.7.1. In a terminal, connect using:
ssh fpga@192.168.7.1
Type yes to trust the device if prompted, and enter the password.
In the VM (not in a SSH session to the FPGA) type:
echo 1 | sudo tee /proc/sys/net/ipv4/ip_forward > /dev/null
sudo iptables -P FORWARD ACCEPT
sudo iptables -A POSTROUTING -t nat -j MASQUERADE -s 192.168.7.0/24
This will enable network address translation and forward packets coming from
192.168.7.*, which includes the FPGA. From an SSH session with
the FPGA you can verify network connectivity by running something like the
following command and looking for responses to your packets:
ping google.comTo turn off forwarding, you can type:
echo 0 | sudo tee /proc/sys/net/ipv4/ip_forward > /dev/null
sudo iptables -t nat -F POSTROUTING
curl -d "username=XX&password=YY" https://horatio.cs.utexas.edu/login.cgi
In order for Cascade to be able to reprogram the DE10's FPGA, your Mini-USB
cable needs to be connected properly. To verify this, run
sudo ./bin/jtagconfig from your quartus install directory (e.g.
"~/Desktop/intelFPGA_lite/18.1/quartus/") and look to see if a
DE-SoC device was detected. See the JIT Backend section of the
Cascade README for more information. If the device isn't detected,
double-check your VM device filters, and try disconnecting the JTAG cable,
running sudo killall jtagd, and reconnecting the cable.
Note that when running quartus_server, your quartus path should look
something like the one given above (possibly including the quotes).
You will likely have to run quartus_server as sudo to
ensure it can access the JTAG device.
Finally, you should be able to run Cascade using the de10_jit backend from the
DE-10 itself using 192.168.7.2
or 192.168.7.5 as the Linux IP parameter. You may also need
to use quartus_host instead of quartus_server to specify the destination IP
address. If you get a connection error, you may need to restart the
quartus_server application on your Linux VM.