Start LabView. Select Start >> Programming >> National Instruments (the bottom choice on the programs menu) >> LabVIEW. It will take a few moments for the program to start. An introductory window will open. Click on the Continue button when this pops up to go on to the main LabView start menu.
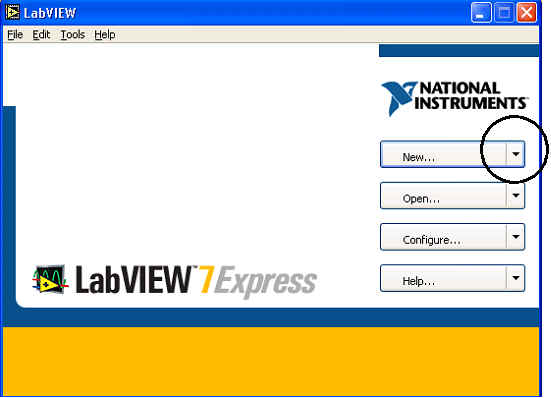
When the LabView start window is open select the arrow on New and
select Blank VI.
LabView programs are known as VIs, which stands
for virtual instrument. The VI consist of two parts, the Front
Panel which is the part someone using the program interacts with and
the Block Diagram which is the part the programmer works with to
create the inner workings of the program. When creating a VI you, the
programmer, can add parts to either the block diagram or the front
panel.
Arrange the block diagram and front panel so they are easier to work with. At the top of either window select Window and then Tile Left and Right or Tile Up and Down depending on you preference. Or your preference may be to only display one window at a time and minimize the other. Note, if you close the front panel display the program will be closed.
Now we are ready to add some components to our program.
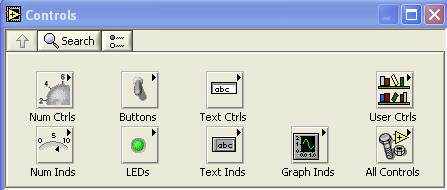
Select the front panel window. When you do you may see a window entitled Controls or
Numeric Controls as shown below.
If you
do not see one of the windows right click in the front panel display and the
window will appear. Click the push pin to keep the controls window open.
Change the view of the Controls menu. To do this click on the options button
which is circled below.

A window pops up named Options. Select the Palette View drop
down menu. From the options for the view select Adavanced.
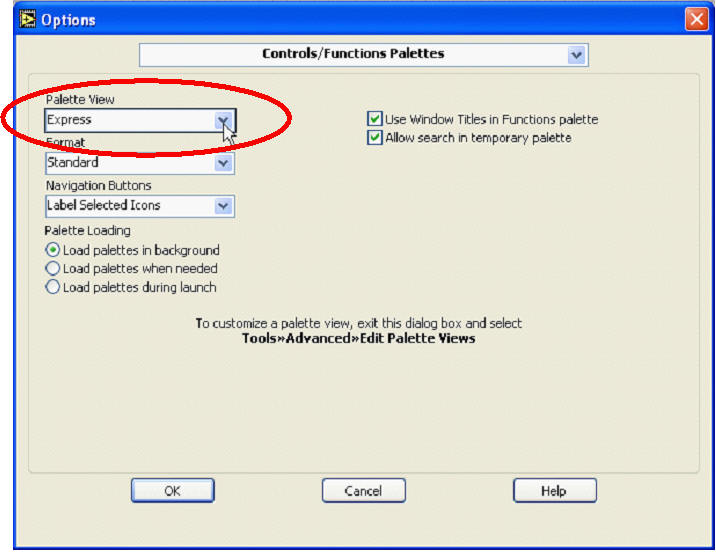
After selecting the Advanced view click the OK button. The
Controls menu should now look like this:

Once
the Controls Window is open and in the advanced view press the Num Ctrls button to open
the Numeric Controls button.
Controls Window (on Front Panel)

Numeric Controls Window (on Front Panel)

Add two Num Ctrl components to the front panel.
The Num Ctrl icon is on the top left of the Numeric Controls
window. To add a single component single click on it in the Numeric Controls
window and drag it into the Front Panel window. When you drag over one
component it will look like this:

The word Numeric is highlighted in black. Go ahead and change the title from
'Numeric to Degrees C' by typing it in. Now add another numeric
control and rename it Degrees F. You should have something like
the following in your front panel:

Notice that when you added components to the front panel components were
automatically added to the block diagram. When programming in LabView you
will be working with both the Front Panel and Block Diagram portions as you
build a program. If the Block Diagram is not being displayed select Window and
Show Block Diagram on the front panel
window.

Now we are ready to work with the Block Diagram. Select that
window. We are converting degrees Celsius to Degrees Fahrenheit. Degrees
Celsius is an input to our program and Degrees Fahrenheit is an output.
Notice in the block diagram that both icons have a small triangle on the
right side pointing away from the icon. This means LabView considers both
components as inputs from a user that will be used else where in the
program. To change the Degrees F component to one that our program sets the
value of instead of the user right click on its icon. A menu will appear.
Select the Change to Indicator option. This turns the Degrees F
component into an indicator or output of the program instead of a control or
input. Notice the Degrees F component now has a small triangle on the left
side pointing into the component.

Remember if a triangle is on the left side of a function / icon that is
an input to the function. If the triangle is on the right side of a
function / icon that is an output from the function.
Now we can connect the input of Degrees C to the output of
Degrees F. Move the pointer to the small output triangle on the Degrees C
icon. A small spool of wire icon will appear.
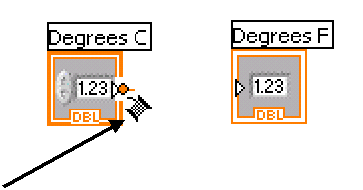
With the wire spool showing single click the mouse. Now drag the wire spool
over to the input triangle on the Degrees F icon. A wire will appear.

With the spool on the input triangle click the mouse again. This will
complete a connection between the Degrees C control and the Degrees F
indicator.

We can test the program now. Select the Front Panel. Type a
number into the Degrees C box. Run the program by pressing the run arrow
near the top left of the front panel window.

When the program runs the value whatever value you typed into the Degrees C
box should be displayed in the Degrees F box.
The program does something at this point, but it is wrong.
The conversion from degrees Celsius to degrees Fahrenheit is not correct. We
must make the adjustments per the formula. Select the Block Diagram window.
The Front Panel window has a Controls window to add components, but in the
Block Diagram window components are added from the Functions window. If the
Functions window is not visible right click in the Block Diagram window and
pin the Functions window. Like the Control Palette the Functions
Palette can be in Express or Advanced View. My examples below assume the
Functions palette is the Express View.
Functions menu (on Block Diagram)

You need to add components to carry out mathematical functions on the input
that represents a Celsius temperature. Select the Arith/Compare
button on the Functions window. On the Arithmetic & Comparison window
select the Numeric button.
(on Block Diagram)
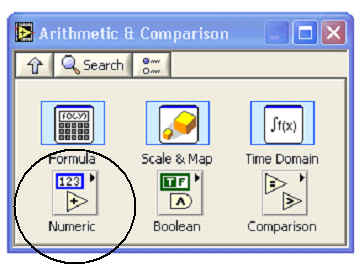
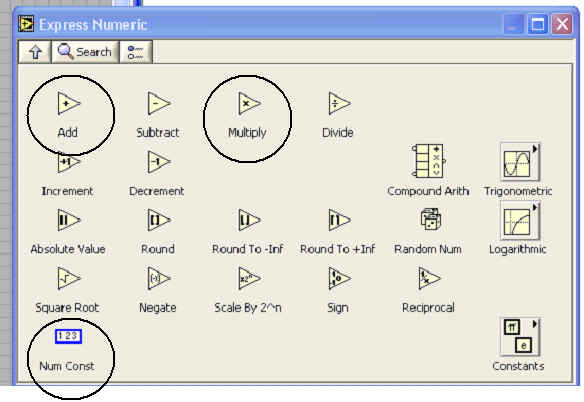
Now you have the Expression and Numeric, Express Numeric window
to choose icons from. We need to multiply the Celsius input by a constant
and add another constant to that. Select and drag one multiply icon, one
addition icon and two numeric constant icons to the block diagram.
(on Block Diagram)
The block diagram will now look something like this:

The next step is to set one numeric constant to 1.8 and the
other to 32. Double click one numeric constant icon and type in 1.8 and
double click the other and type in 32. Now wire the output of Degrees C and
the numeric constant to the multiply operator. Remember the inputs or
operands to multiply are wired into the left side of the function. The
output or result of the multiply function is available on the right side of
the icon. Position the pointer over the
numeric and use the wire spool to connect it to the left side of the
multiply operator.

Now the output of the multiply operator and the numeric constant 32 must be
wired to the input of the addition operator.
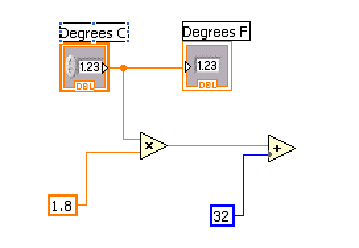
The last step is to connect the output of the addition operator to the
Degrees F indicator. Use the wire spool to make the connection. This induces
an error into the program because the Degrees F indicator can handle one
input but now has input from two sources, directly from the Degrees C
control and the addition operator.

To fix this error click on the wire in between the red X and Degrees F. When
selected the wire will be highlighted. Delete the selected wire. Be careful
when selecting the wire that you use the arrow to select it. It is very easy
to accidentally have the wire spool appear and start making another
connection. If this occurs press the escape key (Esc) on the keyboard to
stop making this connection and try again.
Alternatively you an remove all broken wires by holding down the control key
(Ctrl) and pressing B and the same time. Ctrl - B. This
removes all broken wires from a block diagram and you can then rewire the
output of the Degrees C function to the input of the multiply function.

After deleting the wire the block diagram should look something like this:

Run the program again. To test it. 0 degrees Celsius should be 32 degrees Fahrenheit. 100 degrees Celsius should equal 212 degrees Fahrenheit. Try these values. Try the following things. Type in a value to the Fahrenheit box and then run the program. What happened? Type letters into the Celsius box and run the program. What happened?
As our program only converts 1 temperature. It is very easy
to make the program run, converting as many temperatures as someone likes,
until they quit the program. In the Block Diagram window use the up arrow at
the upper left corner of the Express Numeric functions window to
go back up to the top level functions window. There select the Exec
Ctrl button:
(on Block Diagram)

From the execution control window click and drag the while
loop icon. Position the cursor at the top left of your block diagram
and expand the box so it encompasses all components in the block diagram.
(on Block Diagram)

The block diagram should now look like this:

Run your program now. While the program is running type in a number and hit
return. The conversion should take place. Type in another number and try
again or use the up and down arrows on the Degrees C control to change
temperature. Now the program can convert as many temperatures as a user
likes. To stop the program click the stop button.

What next? Try making one or more of the following changes to the temperature converter. This is your chance to explore the LabView programming environment so detailed instructions are not given.
-
Add a color indicator that changes from blue to red as the temperature goes up.
-
Add a switch on the front panel to allow the user to choose whether they want to convert from degrees Celsius to degrees Fahrenheit OR from degrees Fahrenheit to degrees Celsius.
-
Change the VI so that the user enters a lower and an upper temperature and shows a conversion table from the lower to the upper temperature.