Start LabView and open a new, blank VI. Tile the front panel
and block diagram displays.
Ensure the Controls window is open and select the Numeric Controls icon.
(on Front Panel)

On the front panel add three pointer slide controls from the numeric
controls menu to the front panel itself. These can be horizontal or vertical
sliders.
(on Front Panel)

Alter the name of the slides so that one is labeled Red, one Green, and one
Blue.
Change the range of the input for each slider. There are
many ways to indicate the intensity of red, green, and blue in a given
color. One of the most popular, termed true color uses a scale
from 0 to 255 for the intensity of each color. Right click on the fill
portion of a slider. From the menu that appears select Data
Range

A window entitled Slide Properties appears. First select the Scale tab. Alter the scale of the maximum of this slide to 255.
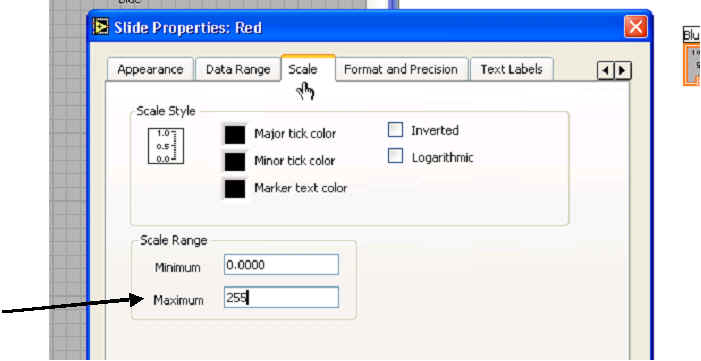
Now select the tab entitled Data Range. Change the
representation of the input from Double Precision to Unsigned byte. Representation refers to how the input from the
slider is treated. Computers store all information as 1s and 0s, but those
1s and 0s can be interpreted many, many ways. Treating the input as double
precision means using 62 1s and 0s to represent the number. (a single 1 or 0
is known as a bit, 8 bits are a byte. A double precision number uses 8 bytes
or 62 bits to represent the number.) In this application we only need to
represent the integers from 0 to 255. To do this requires 8 bits or a single
byte. The term unsigned refers to the fact that this representation does not
allow negative numbers. This makes sense for choosing the intensity of a
color, because it is not possible to have a negative intensity of red, blue,
or green.

Alter the range and representation for the Green and Blue
sliders. If you want to make the display more intuitive you may want to
change the fill color for the Red and Green sliders to the appropriate
color. This can be done by selecting the Appearance tab on the
Slide Properties window and left clicking in the fill color box. This allows
you to select whatever color you want for the fill color of the slider.
Add a box to display the resulting color. On the front panel
drag a Color Box icon from the Numeric Control window to the
front panel itself, below your three sliders.
(on Front Panel)
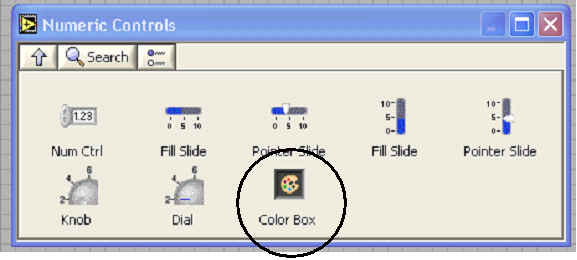
Click on the black color box and make the box larger by expanding it. Change the name of the
color box to Actual Color.
Finally add an indicator for the numeric description of the
color selected with the sliders. Back up to the main Controls window. Select
the Text Inds icon.
(on Front Panel)

Click and drag a String Ind control from the window to the front
panel. A string is a collection of 0 or more characters. In order to put the
numbers representing the amount of red, green, and blue together we will
convert them to strings, piece them together, and then convert the final
result back to a number.
(on Front Panel)

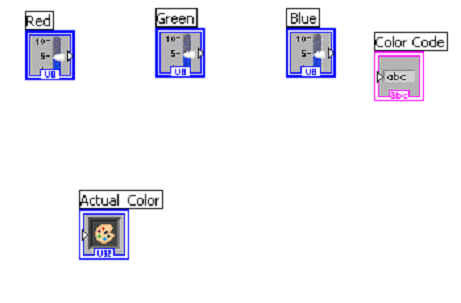
Change the name of the String Indicator to Color Code. Your front panel should
now look something like this:

Right now our program doesn't do anything. We must make the
connections inside the block diagram to take the inputs, convert them to
strings, connect them together, convert the result back to a number and feed
that number to the color box. Your block diagram should look something like
this:
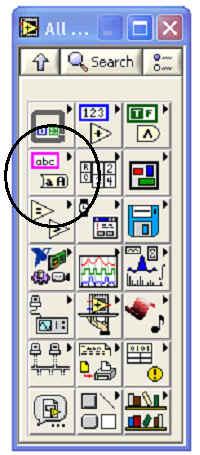
We need a component to convert a number to a string. On the
main Functions window select the All Functions icon.
(on Block Diagram)

On the All Functions window select the String icon. Then on the String window select the
String Number Conversion Icon.
(on Block Diagram)

On the String/Number Conversion window select and drag 3 Number to Hexadecimal String icons and place them on the block
diagram. A Hexadecimal number is a number that is represented in a base 16
system. Most people are familiar with the base 10 numbering system also known
as the decimal system.
(on Block Diagram)
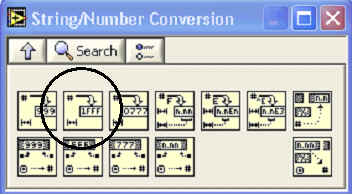
Connect each of the outputs of the red, blue, and green
controls to a separate conversion icon. The proper spot to connect to is the
upper left terminal on the conversion icon. It is also necessary to indicate
the proper width of the input. Navigate on the controls to insert a numeric
constant. Drag this numeric constant to the block diagram and set its value
to 2. Wire the output of this constant to all three of the width inputs on
the conversion icons. The width terminal is the lower left terminal on the
conversion icon. Your block diagram should look something like this:

Now the output of the icons that convert the input numbers
to string must be put together. Concatenation is the term usually
used for connecting strings together. Navigate back to the String menu and
add 2 concatenate string icons.
(on Block Diagram)

Connect the converted Red value to the top terminal of one
of the concatenate icons and the converted Green value to the bottom of the
icon. Connect the output of the 1st concatenate icon to the top terminal of
the 2nd concatenate icon and finally connect the converted Blue value to the
bottom terminal of the 2nd concatenate icon. You block diagram should
now look something like this:

Note, the order of the operands for the concatenate function matters,
just like the order of operands in subtraction or division. In division 20 /
5 = 4, but 5 / 20 = 0.25. The order matters. This is true of concatenation
as well. "Hi" concat " There" = "HiThere", but
" There" concat "Hi" = " ThereHi". The String
we are creating for the color code expects the intensity of Red first, then
Green, then Blue. RRGGBB. The left hand operand to the concatenate function
is the top input. The right hand side operand is the bottom input.
Wire the result of the 2nd concatenate icon to the result
indicator.
Now that the String has been created that represents a color
it must be converted back to a number so that it can be fed to the result
color box. Navigate back to the String/Number Conversion Window and drag a
Hexadecimal String to Number icon to the block diagram.
(on Block Diagram)
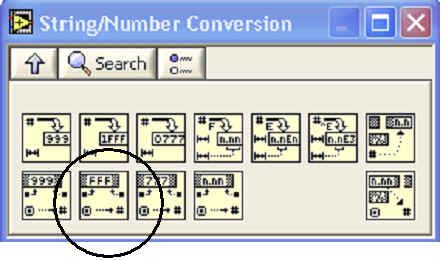
Wire the output of the 2nd concatenate icon to the top left terminal of the
Hexadecimal String to Number Converter.
Right click on the color box to change it to an indicator.
Wire the output of the converter (terminal on the bottom right side) to the
input of the color box.
Finally add a while loop control around the entire block
diagram. Your final program should look something like this:
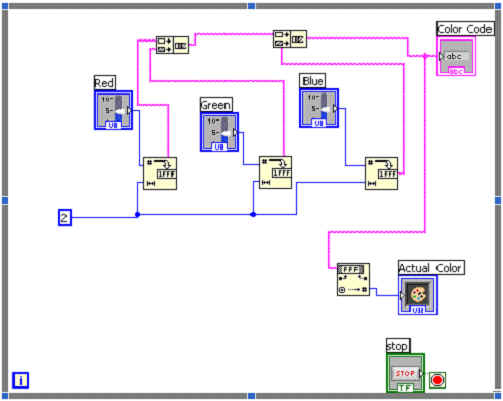
Run your program. Adjust the sliders and notice the output
color. How does one make "Pink", "Purple", "Orange", and
"Yellow"? This format for colors is used in html, the description language
for web pages. Go to a web page and open up the html source for the page.
This is usually done by selecting View and then Source or Page
Source under the View menu. Search for the word "color"
in the html code. You can search rapidly using the find option. Press
the control key and the f key at the same time to open find.
Type in color and search for that word. You will often see a code for the
color. Such as #662626 or #B28B12 or #F1F1FD. (Those are just a few of the
colors on Yahoo!) Enter the color code you find on a web page into your
color picker and see if you can spot the color on the web page.
What next?
-
Add the ability for a user to enter a color code directly instead of using the sliders
-
add loops to create a display of many shades of colors. Don't try and display them ll, but try every 10th or 20th color code.